
Skip here for the instructions, this ain’t a recipe site despite this being a pi project. I don’t have ads, and I don’t care if you read my stuff. Seriously, I won’t be offended.
A lover’s request (preamble)

It all started with a simple request from my wonderful partner. She wanted me to print something for her so she could send it off as soon as she got home.
Just one problem. I’m running Debian 12 and never bothered to install my printer drivers for my canon printer. With a lot of printers, my laptop has been plug and play but for some reason my Canon LBP6030w doesn’t want to cooperate without canon’s specific drivers. Sure, I could just plug in a windows laptop and take care of it, but the only windows devices in this house are my partner’s and she’s not here to unlock any of them. Besides, that’d be cheating.
Luckily, the printer’s linux drivers are still available online at canon’s asia website. Unluckily, it involves a script that is 600 lines long, looks like it was built for Debian 9.8, and installs who knows what else in addition to the driver that I don’t really want to audit. Normally I’d shrug, install the driver, and get it done. But I’d like to print from my laptop and I don’t trust that this driver isn’t going to install a vulnerable version of something that I don’t want on my laptop which has pretty deep access to my homelab, and all sorts of other stuff I’d like to keep secure. Heck, with PrintNightmare, the recent RCE discovered in CUPS a few months ago, and the inherent insecurity of WPS, printers seem just like an all around security nightmare and I’d like to keep them as far removed from my systems as possible.
Oh and then there’s this message saying an internet connection is required to install the software, and I couldn’t find in my brief perusal when it is reaching out to the internet and where it’s going, but sure enough it fails when internet is not present.
| |
Hooking up the cart
Paranoia aside, I don’t have a problem with the software really. However, I like to keep my desktop installs as clean as possible and random software drivers for a printer I rarely use don’t fit the bill for me. So I’m going to install the driver on a raspberry pi 3b, pass through the USB cable to that pi, and then install some neat software called savapage to run a print server on the pi which will allow me to print from any device with a web browser regardless of the drivers the clients have installed.
The keen eyed among you will notice I am still going to be installing that sketchy driver. The difference is the sketchy driver won’t be on my laptop but on a cordoned off IOT network, and I also don’t need to make installing this driver part of my standard new-device setup process.
Wait, where’s my horse?
The problem I didn’t anticipate before flashing the pi, installing cups, and writing a significant portion of this guide on how to do the same is that Canon’s drivers for Linux just flat out don’t work. Seriously, I could not get the printer to print on Ubuntu, Debian 12, or Linux Mint. I decided to plead sanity after I started inspecting the driver files and trying to cobble them together manually. I’m sure that would have worked eventually, but frankly my time is more valuable than that so it was time to move on.
I’m normally an advocate for making what you have work, and I don’t like adding to my in-progress project shelf (AKA: the E-waste pile). But I’ll make an exception here. I’ve had this printer for almost 10 years. At the time, I bought the cheapest option I could find, I wasn’t particularly computer savvy, and it got me through College and then some. Maybe it’s time to just lay it to rest. So I went out and bought a generic Brother HL-L2460DW so I can save my sanity with these silly Canon drivers.
With that out of the way, this experience has once again affirmed the usual joke:
| |
Did I get that thing printed?
No.
Instructions
Scope
These instructions were written for a Raspberry Pi 3b. You can absolutely do all of this in an LXC and connect to the printer over the network via IPP or pass through the USB in the LXC conf. You’ll need to do more configurations for the USB passthrough if you go that route, but you won’t need to follow the manual build instructions I’m including here for savapage for this to work on your machine. I am consciously not hooking up my printer to the network for security reasons despite it having a network port, but nothing is stopping you from going that route if you choose.
I am also assuming you are using a Linux desktop. If you’re on Windows, the only real modification you’ll need is to use something like Rufus to flash the image to the SD card on the pi instead of using the Linux CLI tools.
Flashing the pi with Debian 12
I’m a Debian fan, so I’m downloading their tested image for Debian 12 that works on the pi. You can find these debian images here. I’m not going with Raspbian as I don’t need all the overhead of a desktop and all the extras that come with it. Ubuntu is often recommended as a lite OS for raspberry Pi’s but…. again I’m a Debian fan. Use whatever is your preference but you may need to modify these instructions for your chosen distro.
After downloading and decompressing the image, we need to figure out where exactly the SD card was mounted on the desktop machine. Run lsblk before plugging in your SD card. When I do this, I receive the following output.
| |
After plugging in the SD card it changes to the below output.
| |
So I can see that my SD card is mounted at /dev/sda. The location for raw disk devices in Linux is at /dev/, and we can ignore the sda1 or sda2 on there as those are partitions on /dev/sda. What we’re about to do will overwrite those partitions though, so if they have anything you want to save, pick a different card or pull it off now. Here be dragons.
To write the image to the disk we can just use dd. Change /dev/null to the location of your SD card.
| |
Now hook up a display, keyboard, and networking, then boot up the pi.
Basic Configuration
The root password is empty as of writing.
Let’s start off by updating the pi to the latest software. Go grab a cup of coffee while you wait, the updates will take a minute.
| |
We’ll likely need to restart since this is an image from 2023 and there’s been a kernel update or 2 or 3 since it was created.
| |
Once it’s back up we’ll install sudo and configure our user savapage (you MUST use this username for savapage to work) and set their password.
| |
Next, lets sign out of root and into savapage, then disable the root account’s login.
| |
While we’re here we’ll change the time zone and hostname as well. I’m in America/Chicago but substitute that with your timezone.
| |
I also ran into an issue where I was getting sudo: unable to resolve host pi-printer: Name or service not known every time I ran a sudo command. Thanks to Thomas Ward on askubuntu it was easy enough to fix by adding the hostname /etc/hosts which was absent in the base image. So my /etc/hosts file now looks like below, and the weird error has gone away.
| |
Now one thing about these barebones Debian installs is they don’t include many packages. But they do include sshd, which makes sense for how people want to use these. If you don’t plan on ever using SSH on this machine, the best step is to just run:
| |
However, if you plan on using SSH like me, you’ll just take a few more steps to harden it. If you don’t care to use SSH, skip to Compiling Savapage for the pi.
Hardening SSH
Right now if you were to SSH into your pi, even though you’re prompted for a password the connection will not be encrypted and the password you pass to the pi is visible in clear text over the network to any listeners. Obviously, this isn’t good, which is why key based authentication is the standard for SSH access even locally. For now we’ll ssh into the pi using password authentication so we can copy over the public key.
In savapage’s home directory, run mkdir .ssh, cd ~/.ssh, and then nano authorized_keys copy your SSH client’s public key into this file.
If you do not have a public SSH key, on Windows you can open up a powershell window and run the following. On a linux desktop, you can open your terminal and run the exact same command.
| |
The output will tell you where the public key was saved on your computer (likely in a hidden directory also named .ssh in your user’s home directory. Copy the contents of that file to your pi’s authorized_keys file. Do not copy the private key file contents. The next time you SSH to the machine, you will not be prompted for a password on that computer and the connection will be encrypted.
We need to make a few changes to the config file for SSH to make sure we’ve locked the system down. Edit the file /etc/ssh/sshd_config and ensure the following values are uncommented (do not have a # in front of them), and set correctly.
| |
No user will be allowed to use a password for authentication to this pi after you have done this, and you will be unable to SSH into the root user. Far more secure than the default configuration.
Installing and configuring Cups
First install cups and any drivers for your printers.
| |
also add your user to the lpadmin group
| |
For configuration purposes we’re going to allow external connections to cups. Since we don’t have access to the webui (no desktop on the pi and it only listens on localhost), we’ll need to edit the configuration file manually.
| |
Change the following sections so they appear as below. Note, these options are not all in the same location so do not paste this to the bottom of your config, it won’t work. Also note that I am allowing connections only from 192.168.5.2, which is a specific address on my network since the defaults mentioned in the savapage docs for @LOCAL, only work if you’re on the same subnet. I plan on segmenting this off on the IOT network so the change is necessary. Edit the IP to @LOCAL or your machine’s IP as needed.
| |
Finally we can navigate to the web ui using the IP address of the pi and port 631 http://xx.xx.xx.xx:631. After installing the drivers and cups, I can see on my report at Administration > Manage Printers that my machine was auto-detected without issue. You may need to reboot your machine, or add it manually through the “add a printer” dialog in the cups web ui.
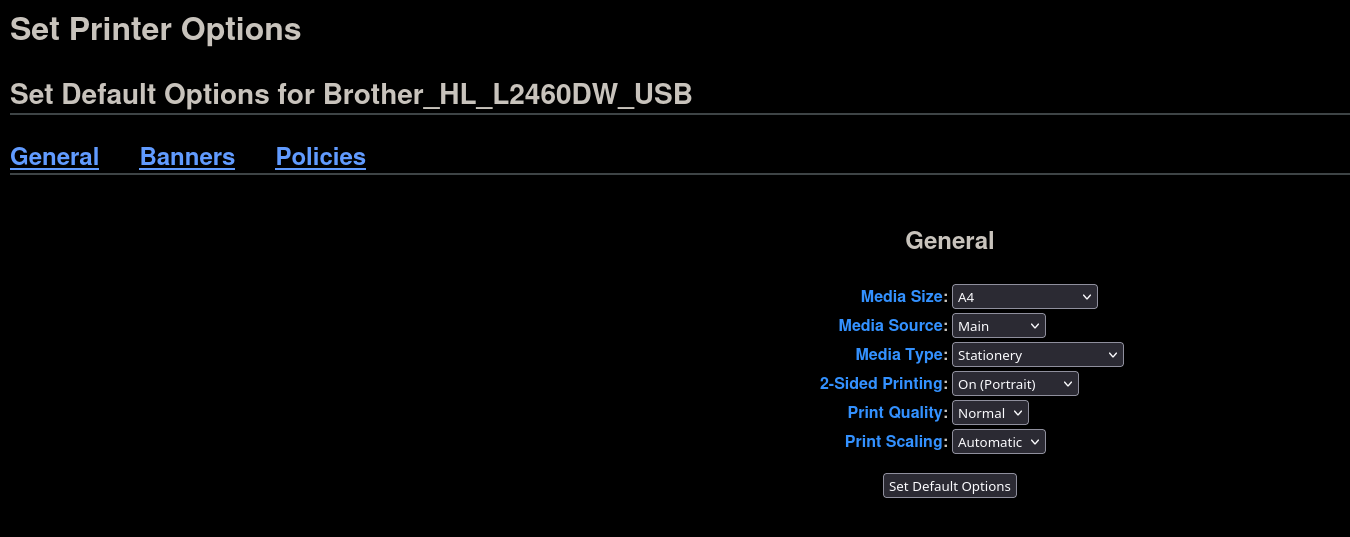
Even though my printer was automatically detected with the brlaser drivers, I want to make a few changes to the defaults mostly to enable duplex printing. Go to Administration > Manage Printers > and select your printer. From there click the dropdown for Administration and choose “Set Default Options” then go ahead and make your changes.
Compiling Savapage for the pi
Run these commands to grab all the bare prerequisites for savapage (plus wget so we can download the installer).
| |
There isn’t an installer for savapage on ARM, but thanks to this community post we know that we can hack it to get it to work. First, download and run the installer. Grab another cup of coffee while you wait, you’ve earned it.
| |
When the script gets to the point of checking the utilities you’ll see the following. This shows that the three packages mentioned in the community post will not execute on our pi’s architecture.
| |
We can get around this from extracting the files from this self-extracting bin, building the troublesome packages manually, transferring our custom built packages to that install directory, and then running the install script within the extracted folder.
To extract the files, run the following.
| |
To build the files we’re going to need to install make, and g++. We also use git to download the packages directly. libpam0g-dev is needed for savapage-pam’s package to compile, the same is true for libcups2-dev for the savapage-cups-notifier. Also keep in mind that xmlrpcpp needs to be compiled before savapage-cups-notifier in a sibling directory per the readme. We’ll do all of this in the home directory of the savapage user.
| |
Now we’ll need to build the software manually. Don’t worry if you’ve never done that before, it’s very simple now that we’ve installed all the prerequisites.
| |
once you’ve built all those, copy the resulting binary to the appropriate section in the installer directory.
| |
Installing savapage
Savapage requires you use /opt/savapage/ as the program directory so let’s create that and set the ownership.
| |
Now we’re good to install savapage on the pi! Once the install is completed it can take a few minutes for the web UI to be available (you are running this on a pi - after all).
| |
Configuring savapage
In a web browser navigate to https://xx.xx.xx.xx:8632/admin (replace xx.xx.xx.xx with the IP address of your pi). Note the /admin is important, it will auto redirect to /user which isn’t functional until you complete the setup. The username is admin and the password is admin which should be the first thing you change by going to options > advanced > reset internal admin password.
After signing in, you’ll be greeted with a message stating savapage is not configured and you need to set values for currency and mail. On the right side of the screen there are helpfully links to both of those items. Simply click on currency and enter USD or whatever denomination you wish to use. Note, you still have to do this even though this is for home use.
Now in the Mail section, you can fill out the information for you SMTP provider. If you don’t care to have mail, fill it in with some junk information because savapage will refuse to work if it is not configured. Here’s how I filled out mine:
| |
Click apply after making each of these edits and the configuration required section will go away!
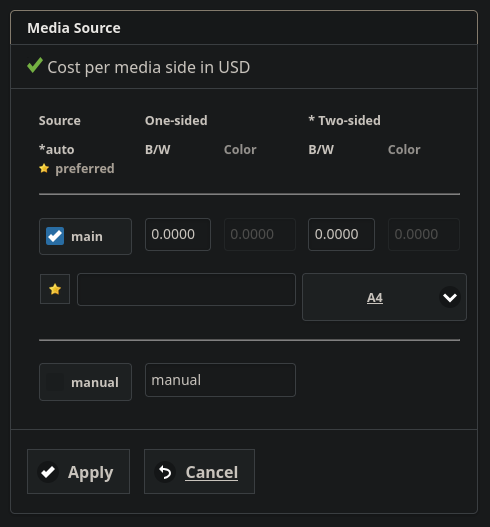
We’ll also want to configure the printer. Select Proxy Printers aand then select the edit icon under your printer. In order for savapage to make the printer visible to users we’ll need to configure a media source. For me I’ll just be selecting “A4” since that’s what I’ve configured in CUPS. Note if you want to configure dual-sided printing you need to do that within the CUPS admin interface.
Adding Users
Now is a good time to mention that savapage is free as in libre, not free as in beer. They do allow permanent visiting status to instances with 10 or fewer users, for home use this is just fine. If you are an institution however and need more licenses, or you just want to support a quite frankly excellent project, you can find the information on subscribing here.
Unless you want to hook up savapage to ldap, creating users is as easy as adding them under the “users” tab on the admin panel. Since I’m using this for home I’m just giving every user every role since I don’t really need to lock it down.
Installing Fonts and configuring document conversion.
The way savapage functions is by having every document printed being converted to pdf before sending it over to the printer. If you only plan on ever printing pdfs, you’re pretty much done now! However, if you want to print xmls, docx, etc… you’re going to want to configure the document conversion features of savapage.
If you only install the document conversion software through libreoffice, they don’t ship with things like Microsoft fonts (because those aren’t libre). This means that savapage will re-create the document as a PDF with only the fonts available to it, which can result in very weird output. The solution to this is to make sure savapage has access to all the fonts it will ever need. To start, lets add the non-free repository for Debian and install a bunch of fonts! Grab a coffee, etc, etc…
| |
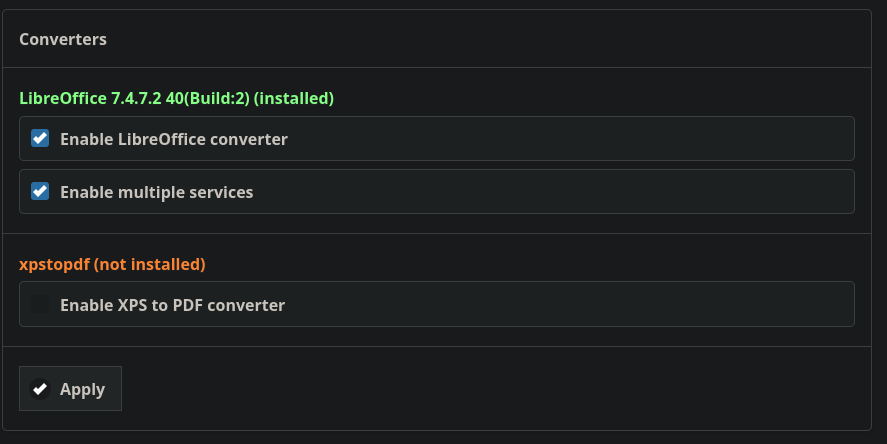
Once that’s done you may need to reboot the pi for the fonts to be seen as available in savapage. But once it’s back up we can turn on document conversion in the admin settings. Navigate to Options > Advanced > Converters and check Enable LibreOffice Converter and “Enable Multiple Services” and click “Apply.” Give this a good minute or two and wait for the “configuration applied” message before proceeding. There’s a lot that happens on the back end with this one step.
Print something!
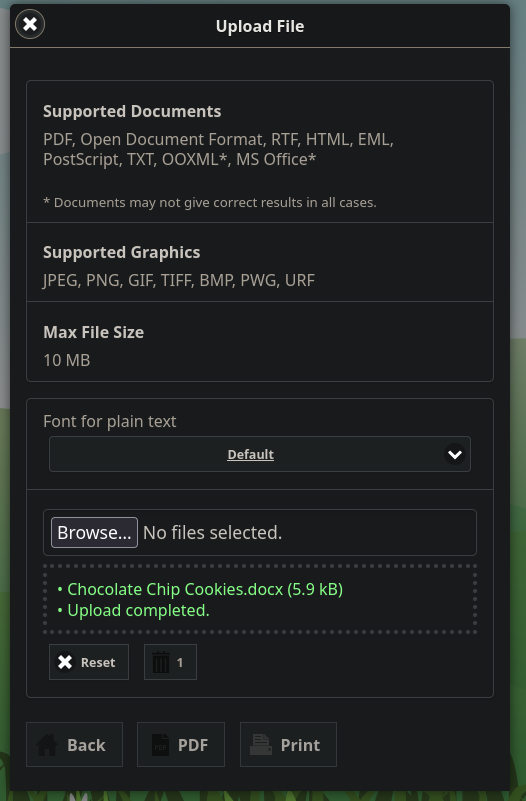
Congratulations, you’re done! Navigate to savapage’s url https://xx.xx.xx.xx:8632/user and sign in with one of the user accounts you created in the Adding Users section. Select the “upload” option in the lower left hand corner, and click “upload.” Once you see the green text that says “Upload completed” go ahead and select print and it should print after a little processing on the pi.
Nginx Configuration
If you want to throw this behind Nginx, here is the config I’m using. I do not use NPM or Caddy so I can’t help you there. Perhaps one day I’ll write a post about my barebones reverse proxy and how to manage it all on the CLI, but it is not this day!
| |